When I first thought of how I was going to store the many text options my first idea was using an XML file to store not only the text. After diving in and looking at a lot of tutorials online, I figured out a way to store everything. The plan for right now is to have an XML file for each scenario that comes with a series of scripts. Each branch is going to have options that the player can select through the objects in the scene. Selecting one of the options will change the scene they are currently in. The best part is, there doesn’t need to be any adjustment to the code for each scene. They select an object which puts an ID in, the script goes through the current scene and looks for that id, and goes to the next branch, changing any variables that are needed.

There need to be a few scripts for each of the XML Files but I believe I’ll find a way to store them more efficiently than what I have right now. The scripts just take the XML file and convert the variables to usable ones using XMLSerialization.

I got a prototype working that changes the text of a UI element depending on the branch the user is in, and what object they click on. Over the week I will assign more variables in the XML file such as points and hopefully I’ll find a way to store audio identifiers to be able to play them after selecting an object.

When using the GVR Video Texture to render 360 video in Unity, there is no built-in way of creating hotspots. When using GVR Video Texture for rendering 360 video, you can place GameObjects within the 360 video sphere; however, those GameObjects will not be hit by raycast. That results in GameObjects being displayed, but not being interactable, and obviously hotspots need to be interactable to be useful. The solution we found was using a UI element (we picked a button) and masking it so it appears invisible. The invisible button can then be placed over an area in your video to make that area interactable. By using event triggers and C# scripting, you can change what happens when you interact with the hotspots.

In our prototype, we have hotspots on each person within the 360 footage. When the user points at a hotspot, the reticle (cursor) animates so the user knows they can click to interact with it. We may also add some audio cues (“Click here to talk…”). When the user clicks, three options will come up for how the user can interact with the person in the scene. Each option is worth either 1, 2 or 3 points depending on the quality of the option. When the user selects an option, a new 360 video plays to show the person’s response to the user’s decision. Then, a new set of hotspots appear for the player to repeat this process.

By adding hotspots, we can make the game more interactive and allow the user to give a more organic response as opposed to simply presenting them with a multiple choice quiz with a video background.

The data we need to display all of this information is in a class called Questions, which contains the text for the questions and answers, the point value associated with each answer, the audio clips for reading aloud to the user, as well as the paths to the next videos that play and the next question which will be displayed based on their choice.

The text, audio and video clip data are mapped to the appropriate UI button element through the QuestionDisplay script.

The attached document/link is only a rough draft of our literature review. We will have a finalize version by Friday, 11/9/2018. To further explain what is on the attached document/link, we have created a bibliography where we have a summary of each article we found useful for our project. This document also has our introduction, conclusion, and reference page. The more structure literature review will be posted on Friday, 11/9/2018. Please contact us if you have any questions or feedback.

https://docs.google.com/document/d/1pVBxY7zsVnFBqJX282illI8LW4BGDN1JT_JK1f_hSiQ/edit

The IRB application has been sent on 11/6/2018. We wanted to do so before the 7th of November, since the IRB board’s next meeting was today, 11/7/2018. All faculty members involved in our project have been added to addendum J. This way, the faculty  will have access to the data and testing results. Now, it will take a week for the reviewers to get back to us with a decision. Once we are approved, we can start testing. However, we will need to send an addendum as we further develop our prototype as well as our focus group questions. We will have updates as we get feedback from the IRB personnel.

Sincerely,

The MasonLIFE VR team

UPDATE: I have fixed the problem described below.

I had to do some reading on the GVR SDK for Unity in order to see what was going wrong. After being unable to use the method below to switch videos, I started to wonder if I could destroy the current video player texture and replace it with a new one. Reading through the documentation showed me that the CleanupVideo() and ReinitializeVideo() methods already do this.

The problem I had was I wrote a function to switch the video URL, cleanup the video (which will delete the prior video) and reinitialized the video (which will send the new URL to the GVR Video Texture). Then I attempted to play the video and, as described below, the video stops at the first frame. The problem is described in the documentation link below:

Because initializing the player and loading the video stream are asynchronous operations, it can be useful to have a callback when the video is ready. This is an alternative to polling the VideoReady property in the Update method. You can register a callback to be called when the video is ready by invokingGvrVideoTexturePlayer.OnVideoEventCallBack().

As it turns out, I was asking the video to play before the video was ready (VideoReady = true). I fixed this problem by letting the code hang until the video actually becomes ready: while(VideoReady != true); The hanging is not palpable to the user so this seems like a good solution to the problem (I may be able to get the amount of time through the developer tools on the Android).

This resolves the problem and now the video sources can be switched via C# script without switching scenes. I also learned to use expansion files and access the videos within the .OBB file through GVR SDK’s documentation. This will be tremendously important for us, as having multiple video clips without use of expansion files could put us way over the apk size limit of 100 MB (some videos, uncompressed, are in the ~10-30 MB range).

—————————————————————————————————————————————

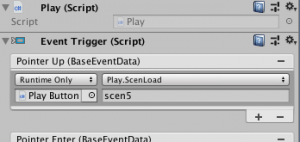
I have been working on getting our video stream to switch on a button click instead of creating a new scene with a new video. Too many scenes can increase the size of our game, which is undesirable.

I have been working with the GVR Video Player Texture. There is supposedly an easy way to switch the video stream, but I have not had success so far. I have successfully changed the URL through which the video plays, but the video tends to freeze on the first frame once the user presses the button. In essence, the video does change; it just doesn’t play. That is not desirable. Google VR has some documentation on swapping the video streaming source here: https://developers.google.com/vr/develop/unity/video-overview.

I will keep working on fixing this problem, as well as explore the potential of using Unity’s built-in video player. (I have used Unity’s built in video player with Daydream, and it does work.)

For our prototype design, my task is to design a Menu Setting with two level of difficulty.

In Asset Store in Unity, I download the package name: Unity Sample: UI for my background. In the package, I used SF Scene to be my back drop background.  I used it because when the user view the background under headset, the background has particles system full of particle moving randomly, which is very pretty.

In the Hierarchy, I created Canvas with two element: TEXT, and 2 buttons. For the text, I labeled it as: SELECT LEVEL, telling the user what to do in the menu. Under Canvas, I also created two 2 button for EASY and HARD, two levels of difficulty.

When the player choose the Easy, it will take the player to easy level in the game, work the same with the HARD level.


Using a code baseline that Caitlin provided, I added more functionality. She experienced issues of the model moving in strange directions when attempting to move. I fixed this by giving the model gravity and locking its y-position.

By using a random number generator, I created a script that makes the character model walk in random directions until the user hovers over the model with the controller. When they do, the model will look at the camera and wave after a brief delay. I was experiencing problems with both of these scripts where things were updating weird and it was inconsistent. I solved this issue by using separate functions instead of the Update() function.

By fixing the problem with the model moving in strange directions, I was also able to make the function where the model walks to the play work. By using Cooperative functions, I was able to make the model wait until it was in it’s walking state before it started to move to the player so that the animation is playing while the model moves.

I was able to create a Play Menu Scene in Unity. It will display a message “PLAY” on the screen and the play symbol below it. When the user wants to start the game, the user will press on the touchpad on the controller of the headset to switch to the main scene of the game.

  1. Unity Play Menu

First, I create the scene in the Asset of Unity. In the Hierarchy, I added a Panel to create a background for the scene. In the Inspector of the Panel, in the Rect Transform, I have to adjust the position of the panel. It took me awhile to adjust the position for the background.  Under Image (Script), I was able to change the color of background and its material as the following:

Next, I added the message “PLAY” and a play symbol into the Panel. I used TextMeshPro-Text for the message and Image for the symbol under UI in Canvas. Same of the the panel, I had to adjust the position of the text and the image to right position, change its color and front under Inspector.

This is the final scene:

2. Changing Scene

The purpose of the play menu is to wait for the user to be ready for the game. The user can point to the play symbol and press on the touchpad of the Headset Controller to change to the main game.

In order to change the scene, I created a C# to implement the process using Unity Scene Manager Library such as

SceneManager.LoadScene

SceneManager.SetActiveScene

After that, I added  an Event Trigger on the Play Symbol on Inspector to switch the scene.

3. Output

I was successfully on changing the scene to the next scene that I wanted, when I pressed not the touchpad. However, Im still not about to active the next scene fully. I will continue to explore and try out different method to implement this output.

Melanie Vu

Today our group met with Dr. Moyher from Mason LIFE. She is extremely enthusiastic about the use of VR as a learning tool for people with IDD. She is a certified behavioral analyst and was able to provide us with invaluable direction for the implementation of our scenarios. We discussed the scenario we picked, which was grocery shopping.

Some of the scenarios we will implement in our game include:

  • Students trying to buy a product, but the display falls over.
  • People trying to lure students (into car, or bathroom)
  • Item you want to buy is not on the shelf
  • Going to the checkout but not having enough money or forgetting credit card
  • Someone bumping their cart into a student
  • No shopping cart available

She will help us determine appropriate choices to give students, especially considering her expertise in students’ behavior and knowing student struggles.

Some features our game should include:

  • Utilizing a rubric to grade student’s responses. Some scenarios will include a good choice, a decent choice and a bad choice. Each response will be weighted accordingly (3pts, 2pts, 1pt) when evaluating a student.
  • We also discussed the importance of corrective feedback. When a student picks the wrong decision, they should be allowed to replay part of the scenario and be told why there is a better choice available. This may be implemented through a video explaining to students why a choice was good or bad. The purpose should always be to teach students and give them an opportunity to learn from their mistakes. This corrective feedback could be implemented through use of embedded videos.
  • In order to promote generalization of skills, the success of a decision will be randomized. (For example, if you ask an employee if an item is in stock, the employee will not always say “yes”)


She also suggested that we go to the local Giant near campus to take our 360 video, since that is the supermarket that all students use for shopping on Sundays. This would be a great way to create an environment that is relatable to students.

We have also decided as a group, along with the feedback from Dr. Moyher, that we should develop for Google Daydream instead of the HTC Vive. The Google Daydream is durable, wireless and much cheaper than the HTC Vive. We also purchased a Chromecast Ultra so we can cast the Daydream view to any monitor with an HDMI input. Our primary concern with Daydream was that we could not view the game on an external monitor, but now that we have found a way to display it on a monitor, that concern is alleviated. The convenience and price of Daydream best fits Mason LIFE’s needs, so we will use that for our project.

  • I (Coralia) went to the IRB office in research hall on 10/25/2018. There I talked to Mrs. Kimberly Paul. She went through the essential steps for a successful IRB registration and what we need to do before we register on IRB Net.
  • First, all members involved in the project should have complete the Group 1 training under the CITI website. All of our group members have done the group 1 training, so we can now move on and submit an IRB application. Mrs. Paul has provided us with resources on how to use IRB Net and how to properly navigate CITI.
  • Everything that we do with the students should be submitted through IRB Net for approval with 2-3 weeks in advance. This includes questions, surveys, what is being shown to the students, what we are planning to test, and data recording.
  • Today, 10/26/2018, we plan to submit out IRB application. An update on the submission and approval will be posted later on.

« Previous PageNext Page »