Although we will use the controllers that ship with Daydream or Vive, we still may want to implement a separate, large button that can stop the game at any time and alert a staff member to help the student take off their equipment. That button could be attached with Velcro to the swivel chair the student sits in. This sort of button could prove helpful if a student is overwhelmed by the game, or simply wants to stop playing for some reason. It could help prevent a student from trying to take off the equipment themselves, preventing the risk of them hurting themselves or dropping equipment.

To start creating this button, we used the following:

  • MSP430 launchpad w/ button
    • Used MSP430 UART sketch for reference
  • HC-05 Bluetooth module
  • Ardity (Unity Asset)
  • Android & Microcontrollers / Bluetooth (Unity Asset)

We will still need:

  • A bigger button. Some bigger buttons are built for arcade use and require 12V power supply (way too much).
  • External power supply for MSP430 to make it completely wireless

The HC-05 Bluetooth module uses the MSP430 UART interface. The module itself connects to a computer through a COM port. When the module is connected to a computer for the first time, you need to pair the device by entering its password (1234). You can tell which port(s) the module uses by right clicking on it.

The MSP430 code is similar to a sketch done by TI (msp430fr69xx_euscia0_uart_04.c) . I simply load data into the TX buffer when one of the on-board buttons are pressed. That triggers an interrupt which transmits the data through the COM port. For the purposes of testing the module, I also wrote that if we send a lowercase ‘h’ to the module, the red on board LED will illuminate.

Then, a terminal program (such as RealTerm or Termite) is used to check that the code is actually working (i.e. you send something and receive from MSP430). I then used Ardity to read from the COM port associated with the module into Unity.

After I determined that the module was working and my code was good, I moved to using this on Android. As before, I downloaded a Bluetooth Terminal App on the Android and confirmed I could send and receive information.

After I did that, I downloaded a Unity asset made for reading Bluetooth module output into an Android. I set it up and confirmed I was able to read data from a button press into our Unity Android game. The downside of this is that the Google Daydream Previewer will not receive data through the Android—it needs to use a COM port from the computer on which Unity is running. However, I am happy that I was able to read a button push into our Unity proof of concept and bring up a “Pause” screen.

I spent a lot of time working with Unity to try to implement some features our game will ultimately have. Some of the features we will need include:

  • Setting up Unity to build to Daydream
  • Switching scenes
  • Using external button to pause game (kind of like a “panic button”) – my Bluetooth Module post explains more
  • Reading user input from Google Daydream controller via Event triggers
    • Reading button clicks
    • Determining when user is pointing at an object (the pointer intersects w. object)
    • Determining when user stops pointing at an object (the pointer leaves object)
  • Playing animations through Unity’s Animator control state machine

I discuss each one below.

Setting up Unity to Build to Daydream

I heavily utilized this video to set up Unity for building to Daydream. This video shows how to install the appropriate SDKs and how to set up the scene. This video also shows the default Unity components you need to delete and replace with the appropriate GoogleVR prefabs.

The hierarchy below shows the proper setup.

Some important things to note include:

  • GvrEventSystem – This allows Unity’s Event Triggers to use triggers from the Google Daydream controller. If you don’t replace Unity’s standard Event System with this prefab, event triggers with Daydream will not trigger.
  • GvrControllerPointer – Its children are ControllerVisual (emulated image of the Daydream remote) and the Laser and reticle. Since the students did make heavy use of the emulated image, it is important this remains in our game. This prefab also overwrites Unity’s default raycasting and instead uses raycasting from the Daydream remote, as we desire.
  • The Player is the parent of the Main Camera and GVR Controller Pointer. To simulate someone’s height, the main camera’s y position is set to 1.6. The GvrControllerPointer has a built-in arm model that will simulate the controller’s position based on the average size of someone’s arm.
  • GvrInstantPreviewMain – A prefab that will let you preview the output of the scene on your phone. This is extremely convenient. It will also let you utilize the Google Daydream controller to play the game.


Switching scenes

Switching between scenes may be helpful in our game. In order to practice using this feature, I found some great videos explaining two important aspects of scene-switching: the Unity Scene Manager library, as well as the function DontDestroyOnLoad.

  • Unity Scene Manager Library: has good documentation on relevant methods, including:
    • GetActiveScene – gets the currently active Scene – useful for knowing whether we are on pause screen or within the game, or of course, simply knowing our current scene.
    • LoadScene – as the name suggests, loads the screen we want, either by name (string) or index. (Index can be helpful in games with sequential levels—you can increment or decrement index as appropriate to advance/reload.)
  • DontDestroyOnLoad
    • When I first tried to switch scenes, I got an error indicating that I destroyed my main camera. When I clicked the error, I saw that GvrInstantPreviewMain will destroy the main camera when you switch scenes. To prevent that from happening, you can use the DontDestroyOnLoad to keep the main camera via C# script. I used DontDestroyOnLoad to keep the main camera, but when the next scene loaded, it was extremely dark! I then realized that my directional lighting was also being destroyed. Within my C# script, I added a line to keep the directional lighting from being destroyed:         DontDestroyOnLoad(GameObject.Find(“Directional Light”));

The GameObject.Find method is extremely helpful to get a game object from its name. The other (faster) way of getting a game object is through its instance ID. However, for trying to learn Unity quickly, GameObject.Find is quite helpful.


Using external button to pause game (kind of like a “panic button”)

When first testing the Bluetooth module, I downloaded the Ardity asset. (Although it is designed for Arduino, it works with any module which communicates through a COM port—the HC-05 uses a COM port, so it works well.) I followed the setup instructions and printed what I was sending/receiving from the MSP430 to the console.

However, an Android does not have a COM port. Serial Bluetooth communication through an Android is completed using Serial Port Bluetooth Profile (SPP). There were no free assets to accommodate SPP communication, so we purchased a $20 asset to facilitate the communication. The asset works great (particularly after I read the instructions 😊 ) and it was simple to read data from the MSP430. I modified my prior Code Composer Studio Code to send a single byte (unsigned char) instead of a lot of unsigned chars + \n\r because we really only need to see if the button was pushed (by checking if an unsigned char arrived) and we are not reading out the message. If we decide that needs to change, I will modify my CCS code.

Now, when a button on MSP430 is pressed, a menu pops up indicating the game is paused.

Reading user input from Google Daydream controller via Event triggers

Event triggers are used to watch for events described in GvrEventSystem. These events include determining whether the reticle of the Daydream pointer is interacting with a given object. Within the Event Trigger itself, you can pick a target object and attach your own C# script to do just about anything (such as change color, start animations, as more fully discussed below, move a character, output text to the screen, etc.)

Some of the events we will probably most heavily use in game are:

  • Reading Daydream button clicks
  • Determining when user is pointing at an object (the controller pointer intersects w. object)
  • Determining when user stops pointing at an object (the controller pointer leaves object)

Playing Animations in Unity

We may need to use animations in our prototype. However, we used animations in our basic game to show that some of the concepts above (especially reading user input) actually work. I downloaded a free humanoid asset with different animations.

Animations in Unity are controlled by use of an Animation Controller. The controller itself is a state machine, as shown below.
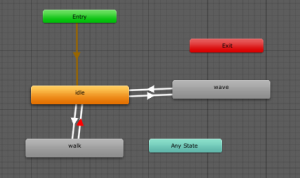
The arrow in gold shows the selection of the default animation (i.e. the animation that plays on game start). The other arrows, shown in white, are state machine transitions. The transitions occur upon setting of a “Trigger.” I learned through testing that triggers are the simplest and most reliable way to get an animation to play. (I had initially followed some videos that use C# scripting to get the animations to play, but there were problems with the animation playing continually, and sometimes the animation would continually restart without completing.) The trigger will create the state machine transition and the animation will play without any of the restarting problems described before.

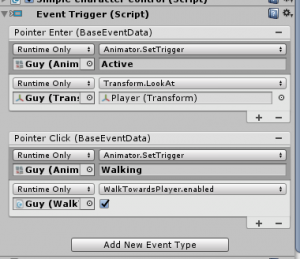
Animation triggers can be set via event triggers as discussed above. An example is shown below. When the player points the Daydream controller at our game object (Guy), the Active trigger is set, which creates a transition from the (default) idle state to the waving state. After the waving animation completes, it automatically transitions back to the idle state. You can also see that I created a script for Guy to look at the player by using the LookAt script. These two events happen contemporaneously, and because the LookAt script runs so quickly, Guy turns to the player before waving, as we desire.
  1. Last Wednesday Oct.  17th, Mara, Coralia and I visited the Mix to try out the HTC Vive for ourselves and have some first hand experience with it. We thought the headset was heavier than expected, but was very fun and immersive. We liked using the controls very simple to maneuver with. We were able to experience the VR headset while sitting down and standing, we didn’t feel disoriented on either occasion. Overall the experience with the headset and controllers were great, although there may be some difficulty with the weight of the headset for the students. We will be bringing the 3 students from MasonLIFE to test out three different headsets; HTC Vive, Oculus rift and Google Daydream on Friday the 19th and let them give us their input on each headset, hopefully allowing us to narrow our choice of VR headset.
  • Today we tested three different types of virtual reality (VR) headsets (HTC Vive, Oculus Rift, Google Daydream) with three students from the Mason LIFE program. We coordinated with the staff at the MIX to help get students set up, as well as recommend good introductory tutorials/games for students to play with. We were careful to avoid any tutorials that involved violence.
  • These three students were chosen from Mason LIFE administration based on who they think could understand and use VR comfortably.
  • Two out of the three students had some sort of experience with VR. (One of the two had used a system similar to Daydream; the other had experienced a VR roller coaster in an arcade.) One student had never utilized VR.
  • Two out of three students wore glasses. One student kept their glasses on for all three demos. One student took their glasses off partway through the demos.
  • All three students play video games in their spare time.
  • The students played a tutorial on each system for approximately five minutes each. Before starting the next tutorial, students were offered to take a break and were asked if they felt dizzy or uncomfortable. (Of course, it also took time to set up the system for the students, so they ended up having a few minutes’ break between each tutorial.) Although some students did take breaks, none of the three indicated at any point that they felt dizzy. One student indicated that the Vive headset was a little tight and wanted to take a break because it “pinched” him a little—but not because of any sort of motion sickness.
  • We tested each student with the Google Daydream, the HTC Vive, and the Oculus Rift.
    • Google Daydream:
      • The students stayed seated and viewed the Welcome demo that showed them some nature scenes, as well as some interactive museum displays. The demo itself was a tutorial on how to use the Daydream controller.
      • The tutorial tested ability to point-and-click at various on-screen items. For example, they had to play fetch with a fox by pointing at the stick, clicking to pick it up, waving the controller and releasing the button to throw the stick. All three students were able to use the controller in a point-and-click context with no trouble whatsoever.
      • All three students quickly picked up on how to use the Daydream controller. All three heavily utilized the emulated image of the controller within the VR app to make sure they were pressing the right buttons.
      • In spite of that, one student indicated that it was hard to know which button you pressed (considering the Daydream controller has three small buttons).
      • The three students indicated that the Daydream headset felt lightest.
      • This tutorial only uses on-text prompts (there is no voiceover). One student struggled with reading and interpreting on-text prompts. One part of the tutorial prompts the student to ‘follow the butterfly to align the headset.’ The student struggled to read the text and told us that “the screen was black.” The screen itself had a black box with text on it, which confused the student. When we read the text aloud to the student, the student progressed through the rest of the tutorial quickly. This is a reminder that our project must be accessible for students who cannot read well.
      • The Google Daydream headset was difficult to adjust for students. The headset, even when adjusted to be tightest and when the strap was moved further up on the student’s head, was simply too big for one student, who had to hold it in place a little bit as the tutorial progressed.
    • HTC Vive
      • The students sat in a swivel chair and played theBlu demo, where they explored the ocean by looking in three different scenes. They were able to sit amongst, and look around at, some fish, a whale, and a dark part of the ocean. They would use their controllers as flashlights to hold up and look around at different parts of the ocean by lighting it up.
      • The only main complaint that the students added was that the headset of the HTC Vive was a little bit heavy for some of them, and a little tight on the nose for one student. Other than that, there were no issues with things like the controllers, or feeling dizzy from the game, or wanting to end the game early because they were uncomfortable.
      • The process of the set-up when using the HTC Vive was a little bit extensive because we needed someone to help the student put the controllers around their wrists to hold them safely, and then to help them put the headset on and adjust the velcro straps so that it was the right tightness for them.
      • One of the staff members at the MIX was able to help us set up the small demos that the students would use. When the next demo needed to be started he would simply use one of the controllers the students were holding in order to get it started. However, one of the students was able to do this on their own and proceed forward with new demos on his own.
      • The demos that the students went through on the HTC Vive were the simplest out of all of them and had the least interactions. All three of them had expressed that they would like something a little bit more complicated and interactive because these demos were not as exciting for them as the other two headsets were.
    • Oculus Rift
      • They were seated in a swivel chair and were able to be in a more active game (Oculus First Contact) where they were interacting with a robot and achieving tasks using the controller.
      • All three students struggled with using the controller for the Oculus Rift, particularly since it has two triggers (in addition to other buttons) on each of the two controllers. However, students liked the fact that they could “see their hands” within the game.
      • The Oculus headset was easiest to adjust.
  • We asked them a couple questions throughout the testing of each device and then at the end of all the testing we sat with all of them and asked some questions about comparing the three headsets and controllers
    • The overall consensus was the following:
      • All three students were able to complete the tutorials on all three systems without any major problems.
      • They liked the games that were more interactive. (Oculus Rift, Google Daydream)
      • They felt that the HTC Vive headset was heavy, and the Google Daydream was the lightest out of all of them, but none of them complained about being uncomfortable using any of the headsets.
      • They were able to use the headset for at least 5 minutes each, while wanting to go even longer with most of the games.
      • The students were very positive about all three systems. It was difficult to get any negative feedback at all. Our group observed student difficulties with controllers (Oculus Rift) and on-screen text (Google Daydream). The students told us that the controllers were difficult to use with Oculus Rift, but they also enjoyed the First Contact game very much.
      • Generally they really enjoyed the experience and liked using VR. When asked if they would like to use VR again, they all enthusiastically said “yes.”
  • We have obtained permission to take 3 Mason LIFE students + Mason LIFE Staff member to try out some different VR headsets this Friday, October 19 and try some of the built-in tutorials. Their feedback will help us decide which one to pick, as well as confirm students are able to comfortably use VR. Some questions we will ask include:
    • Which headset feels better to wear
    • Which game did you like most
    • Which controller do you like most
  • The headsets we are considering include:
    • Google Daydream (available at GMU’s CLUB)
    • HTC Vive (available at GMU’s MIX @ Fenwick)
    • Oculus Rift (available at GMU’s MIX @ Fenwick)
  • We learned that Mason LIFE would like a game that simulates problems encountered in a supermarket setting. This is a setting all Mason LIFE students are familiar with and could be helpful in building resiliency. These problems include (but are certainly not limited to) items being accidentally knocked over, people bumping into you, etc.
  • We will get more feedback from students about what controller they prefer and confirm they can use the controller. In order to complete the task of attempting to interface MSP430 with Unity, our group just received a Bluetooth module (JY-MCU HC-06) in the mail for us to utilize. MSP430 may be used as a “panic button.”

The proposal submitted on October 12, 2018 is below:

10.12.2018 – Mason LIFE VR Project Proposal

Project Proposal

This is our current proposal. In here we describe our purpose and reasoning behind what we’re doing. As well as a technical explanation of how we are going to implement this application.

« Previous Page