October 26, 2018
I spent a lot of time working with Unity to try to implement some features our game will ultimately have. Some of the features we will need include:
- Setting up Unity to build to Daydream
- Switching scenes
- Using external button to pause game (kind of like a “panic button”) – my Bluetooth Module post explains more
- Reading user input from Google Daydream controller via Event triggers
- Reading button clicks
- Determining when user is pointing at an object (the pointer intersects w. object)
- Determining when user stops pointing at an object (the pointer leaves object)
- Playing animations through Unity’s Animator control state machine
I discuss each one below.
Setting up Unity to Build to Daydream
I heavily utilized this video to set up Unity for building to Daydream. This video shows how to install the appropriate SDKs and how to set up the scene. This video also shows the default Unity components you need to delete and replace with the appropriate GoogleVR prefabs.
The hierarchy below shows the proper setup.
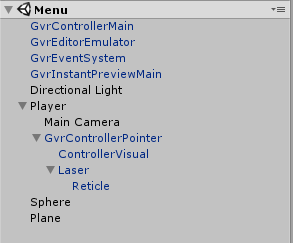
Some important things to note include:
- GvrEventSystem – This allows Unity’s Event Triggers to use triggers from the Google Daydream controller. If you don’t replace Unity’s standard Event System with this prefab, event triggers with Daydream will not trigger.
- GvrControllerPointer – Its children are ControllerVisual (emulated image of the Daydream remote) and the Laser and reticle. Since the students did make heavy use of the emulated image, it is important this remains in our game. This prefab also overwrites Unity’s default raycasting and instead uses raycasting from the Daydream remote, as we desire.
- The Player is the parent of the Main Camera and GVR Controller Pointer. To simulate someone’s height, the main camera’s y position is set to 1.6. The GvrControllerPointer has a built-in arm model that will simulate the controller’s position based on the average size of someone’s arm.
- GvrInstantPreviewMain – A prefab that will let you preview the output of the scene on your phone. This is extremely convenient. It will also let you utilize the Google Daydream controller to play the game.
Switching scenes
Switching between scenes may be helpful in our game. In order to practice using this feature, I found some great videos explaining two important aspects of scene-switching: the Unity Scene Manager library, as well as the function DontDestroyOnLoad.
- Unity Scene Manager Library: has good documentation on relevant methods, including:
- GetActiveScene – gets the currently active Scene – useful for knowing whether we are on pause screen or within the game, or of course, simply knowing our current scene.
- LoadScene – as the name suggests, loads the screen we want, either by name (string) or index. (Index can be helpful in games with sequential levels—you can increment or decrement index as appropriate to advance/reload.)
- DontDestroyOnLoad
- When I first tried to switch scenes, I got an error indicating that I destroyed my main camera. When I clicked the error, I saw that GvrInstantPreviewMain will destroy the main camera when you switch scenes. To prevent that from happening, you can use the DontDestroyOnLoad to keep the main camera via C# script. I used DontDestroyOnLoad to keep the main camera, but when the next scene loaded, it was extremely dark! I then realized that my directional lighting was also being destroyed. Within my C# script, I added a line to keep the directional lighting from being destroyed: DontDestroyOnLoad(GameObject.Find(“Directional Light”));
The GameObject.Find method is extremely helpful to get a game object from its name. The other (faster) way of getting a game object is through its instance ID. However, for trying to learn Unity quickly, GameObject.Find is quite helpful.
Using external button to pause game (kind of like a “panic button”)
When first testing the Bluetooth module, I downloaded the Ardity asset. (Although it is designed for Arduino, it works with any module which communicates through a COM port—the HC-05 uses a COM port, so it works well.) I followed the setup instructions and printed what I was sending/receiving from the MSP430 to the console.
However, an Android does not have a COM port. Serial Bluetooth communication through an Android is completed using Serial Port Bluetooth Profile (SPP). There were no free assets to accommodate SPP communication, so we purchased a $20 asset to facilitate the communication. The asset works great (particularly after I read the instructions 😊 ) and it was simple to read data from the MSP430. I modified my prior Code Composer Studio Code to send a single byte (unsigned char) instead of a lot of unsigned chars + \n\r because we really only need to see if the button was pushed (by checking if an unsigned char arrived) and we are not reading out the message. If we decide that needs to change, I will modify my CCS code.
Now, when a button on MSP430 is pressed, a menu pops up indicating the game is paused.
Reading user input from Google Daydream controller via Event triggers
Event triggers are used to watch for events described in GvrEventSystem. These events include determining whether the reticle of the Daydream pointer is interacting with a given object. Within the Event Trigger itself, you can pick a target object and attach your own C# script to do just about anything (such as change color, start animations, as more fully discussed below, move a character, output text to the screen, etc.)
Some of the events we will probably most heavily use in game are:
- Reading Daydream button clicks
- Determining when user is pointing at an object (the controller pointer intersects w. object)
- Determining when user stops pointing at an object (the controller pointer leaves object)
Playing Animations in Unity
We may need to use animations in our prototype. However, we used animations in our basic game to show that some of the concepts above (especially reading user input) actually work. I downloaded a free humanoid asset with different animations.
Animations in Unity are controlled by use of an Animation Controller. The controller itself is a state machine, as shown below.
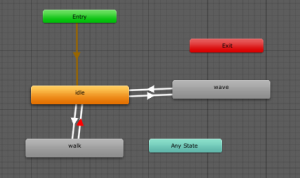
The arrow in gold shows the selection of the default animation (i.e. the animation that plays on game start). The other arrows, shown in white, are state machine transitions. The transitions occur upon setting of a “Trigger.” I learned through testing that triggers are the simplest and most reliable way to get an animation to play. (I had initially followed some videos that use C# scripting to get the animations to play, but there were problems with the animation playing continually, and sometimes the animation would continually restart without completing.) The trigger will create the state machine transition and the animation will play without any of the restarting problems described before.
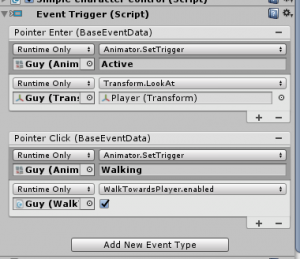
Animation triggers can be set via event triggers as discussed above. An example is shown below. When the player points the Daydream controller at our game object (Guy), the Active trigger is set, which creates a transition from the (default) idle state to the waving state. After the waving animation completes, it automatically transitions back to the idle state. You can also see that I created a script for Guy to look at the player by using the LookAt script. These two events happen contemporaneously, and because the LookAt script runs so quickly, Guy turns to the player before waving, as we desire.